Integrating Xcode for Games in Unity: A Comprehensive Guide in 2023
Introduction:
In game development, Unity and Xcode are two powerful tools that can work hand in hand to create incredible gaming experiences for various platforms, especially for iOS. Unity, a versatile game engine, allows developers to easily build games, while Xcode for games, Apple’s integrated development environment (IDE), provides the necessary tools for iOS app development. By integrating Xcode into Unity, developers can harness the full potential of both platforms to create high-quality games for iOS devices. In this blog post, we’ll explore the process of integrating Xcode for games in Unity and highlight its benefits.
1. Setting Up the Environment: Ensure you have Unity and Xcode for games installed on your machine before integrating. Unity is available for download from the official Unity website, while Xcode can be obtained from the Mac App Store or Apple’s website. Ensure you have both software’s latest versions to take advantage of the latest features and improvements in Xcode for games.
2. Exporting the Unity Project: Once you have completed your game development in Unity, it’s time to export your project for Xcode integration. Follow these steps to export your Xcode for the games Unity project:
3. Go to File > Build Settings in Unity. b. Select the target iOS platform and click “Switch Platform.” c. Configure the settings for your iOS build, including resolution, orientation, and icon. d. Click “Build” and select a destination folder for your Xcode for the game’s project.
4. Opening the Project in Xcode for games: After exporting the Unity project, navigate to the destination folder and locate the generated Xcode project file. Double-click on it to open it in Xcode for games. This action will launch Xcode with your project loaded and ready for further customization and compilation.
5. Customizing the Xcode for Games Project: Xcode for Games provides a range of options to customize your project, allowing you to tailor it according to your game’s requirements. Some essential customizations include:
6. Configuring project settings: Set the bundle identifier, deployment target, and other relevant information in the project settings. b. Managing provisioning profiles: Connect your Apple Developer account to Xcode and set up provisioning profiles for testing and distribution. c. Adapting launch screens: Design and implement launch screens to provide a polished and professional experience for players. d. Handling app permissions: Adjust privacy permissions for accessing device features such as the camera, microphone, and location services.
7. Building and Testing the Game: With the Xcode project customized, it’s time to build and test your game on iOS devices or the simulator. Follow these steps to build and run your Xcode for games:
8. Connect your iOS device to your computer, or choose an iOS simulator. b. Select your device or simulator from the Xcode for Games toolbar. c. Click the “Build and Run” button to build the project and launch the game on the selected device or simulator. d. Test your game thoroughly, ensuring all features, controls, and functionalities work as intended.
9. Publishing to the App Store: Once you have tested and polished your game, you can prepare it for submission to the App Store. This process involves additional steps, including:
10. Optimizing Performance: When working with Unity and Xcode for games, it’s crucial to optimize the performance of your game to ensure smooth gameplay and efficient resource utilization. Take advantage of Xcode for games profiling and debugging tools to identify performance bottlenecks and optimize your code. This includes optimizing rendering, reducing memory usage, and improving frame rate.
11. Utilizing Native iOS Features: Integrating Xcode with Unity allows you to leverage native iOS features and functionalities in your game. You can access device-specific capabilities like the camera, gyroscope, accelerometer, and touch gestures through Xcode’s APIs and frameworks. This integration enables you to create immersive and interactive experiences tailored for iOS devices.
12. Implementing In-App Purchases and Monetization: Xcode for games provides the tools and frameworks for implementing in-app purchases and monetization strategies in your Unity game. You can utilize Xcode’s StoreKit framework to enable in-app purchases, subscriptions, or virtual currency systems, allowing you to generate revenue from your game.
13. Supporting Game Center and Social Integration: Game Center integration is crucial for adding leaderboards, achievements, and multiplayer features to your game. With Xcode for games, you can easily incorporate Game Center functionality using the GameKit framework. Additionally, you can integrate social sharing capabilities to enable players to share their achievements or invite friends to join the game.
14. Handling Push Notifications: If you want to engage and retain players, consider implementing push notifications in your game. Xcode for games provides the tools and services to handle push notifications effectively. You can use Apple’s Push Notification service (APNs) and Xcode’s Notification Center APIs to send notifications to players, promoting updates, events, or personalized messages.
15. Implementing App Analytics and Tracking: Xcode offers integrated analytics and tracking capabilities through App Analytics and the App Store Connect platform. Integrating your Unity game with Xcode lets you gather valuable insights into user behavior, performance metrics, and conversion rates. This data can help you make data-driven decisions to optimize your game and improve player engagement.
16. Supporting Apple’s Guidelines and App Store Policies: When integrating Xcode for games in Unity, it’s important to adhere to Apple’s guidelines and policies for app development. Ensure that your game meets the requirements set by Apple in terms of design, content, privacy, and user experience. Following these guidelines can avoid rejection during the App Store review process.
17. Staying Updated with Unity and Xcode Versions: Unity and Xcode continuously evolve, with regular updates and new features introduced. It’s essential to stay updated with the latest versions of both software to take advantage of bug fixes, performance enhancements, and new functionalities. Regularly check for updates and consider upgrading your projects to newer versions when appropriate.
Considering these additional points, you can further enhance your integration of Xcode for games in Unity and create compelling, feature-rich experiences for iOS users. Remember to stay informed about the latest tools, features, and best practices to make the most out of Unity and Xcode for game integration. Happy game development!
Creating an App Store Connect record:
Set up your game’s metadata, including title, description, keywords, and screenshots, in App Store Connect. b. Configuring app icons and assets: Provide the required app icons and additional assets for the App Store listing. c. Archiving and validating the build: Use Xcode’s archive feature to create and validate an app archive to ensure it meets Apple’s guidelines and requirements. d. Submitting the build to the App Store: Once it has been successfully archived and validated, you can upload it to the App Store for review.
Follow these steps to submit your game:
- a. Select the archived build in Xcode’s Organizer window.
- b. Click on the “Distribute App” button.
- c. Choose the distribution method through App Store Connect or ad-hoc distribution.
- d. Provide the necessary information and follow the submission process as guided by Xcode.
- e. Once submitted, your game will undergo the review process by Apple. Monitor the status of your submission in App Store Connect.
Iterating and Updating:
Game development is an iterative process, and after your game is published, you may receive user feedback or identify areas for improvement. To update your game on the App Store, follow these steps:
- Make necessary changes and improvements to your Unity project.
- b. Repeat the process of exporting the project and opening it in Xcode.
- c. Customize the Xcode for the game’s project if needed.
- d. Build, test, and validate the updated version.
- e. Submit the updated build to the App Store for review.
How CocoaPods Streamline iOS Dependency Management?
CocoaPods is a popular dependency management tool for iOS development, allowing developers to integrate third-party libraries and frameworks into their projects easily. When working with Unity and Xcode for iOS game development, incorporating CocoaPods into your workflow can simplify adding and managing external dependencies. In this blog post, we’ll guide you through installing CocoaPods and integrating it with your Unity project to streamline iOS dependency management.
1. Prerequisites: Before installing CocoaPods, ensure that you have the following prerequisites in place:
2. Xcode: CocoaPods relies on Xcode’s build system, so ensure you have Xcode for games installed on your Mac. You can download Xcode from the Mac App Store or Apple’s Developer website.
3. Ruby: CocoaPods is built on Ruby, so ensure you have Ruby installed on your machine. Macs typically come with Ruby pre-installed. To check the version of Ruby installed, open the Terminal and enter the command: ruby -v.
4. Command Line Tools: Install Xcode’s Command Line Tools if you haven’t already. Open the Terminal and run the command: Xcode-select –install.
5. Installing CocoaPods: Follow these steps to install CocoaPods:
- a. Open the Terminal application on your Mac.
- b. Install CocoaPods by running the following command:
- Sudo gem install cocoapods
- Note: You may be prompted to enter your administrator password during installation.
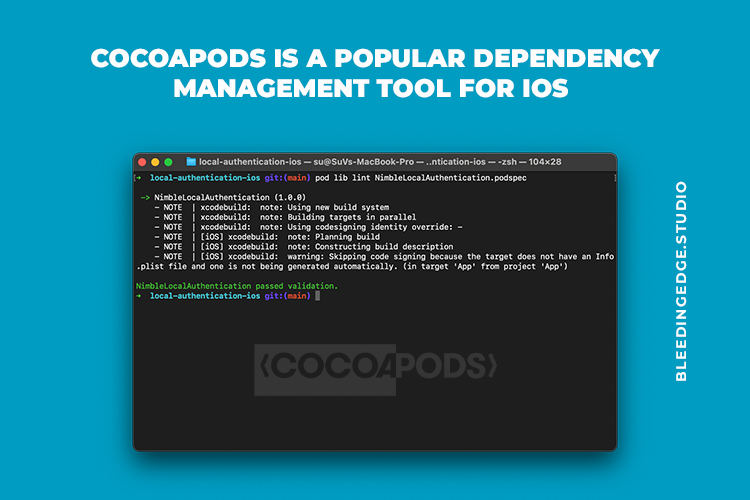
- c. Once the installation is complete, verify that CocoaPods is successfully installed by running the following:
- pod –version
This command should display the version of CocoaPods installed on your machine.
6. Creating a Podfile: To use CocoaPods in your Unity project, you must create a Podfile. The Podfile specifies the dependencies for your project and allows CocoaPods to manage them. Here’s how to create a Podfile:
- a. Navigate to your Unity project’s root directory using the Terminal.
- b. Run the command to create a Podfile: pod init
- c. This will generate a Podfile in your project’s root directory. Open the Podfile using a text editor.
7. Adding Dependencies: In the Podfile, you can add the dependencies (libraries or frameworks) you want to include in your Unity project. CocoaPods has an extensive library ecosystem, and you can search for libraries on the official CocoaPods website. Here’s an example of adding a dependency:
platform: ios, ‘9.0.’
Target ‘Unity-iPhone’ do
pod ‘YourDependency’
end
Replace ‘YourDependency’ with the library name you want to include.
8. Installing Dependencies: After specifying the dependencies in your Podfile, you need to install them using CocoaPods. Here’s how:
- a. In the Terminal, navigate to your Unity project’s root directory.
- b. Run the following command to install the dependencies: pod install
- c. CocoaPods will analyze the Podfile and download the specified dependencies, creating a new workspace file (*.xcworkspace) in your project’s root directory.
9. Integrating CocoaPods with Unity: Now that you have installed CocoaPods and its dependencies, it’s time to integrate it with your Unity project:
- a. In Unity, open your project.
- b. Go to Edit > Project Settings > Player.
- c. In the Player Settings window, navigate to the iOS tab.
- d. Under the “Custom Xcode Project” section, enable the “Custom” option.
- e. In the “Xcode Project” field, browse and select the generated *.xcworkspace file created by CocoaPods.
- f. Click the “Apply” or “Player Settings” button to save the changes.
10. Building and Running the Project: With CocoaPods integrated into your Unity project, you can now build and run your game using Xcode:
- a. Open the generated *.xcworkspace file by double-clicking on it. This will launch Xcode for games with your project loaded.
- b. In Xcode, select the target device or simulator from the toolbar.
- c. Click the “Build and Run” button to build the project and launch the game on the selected device or simulator.
- d. Xcode will handle the compilation process and automatically include the CocoaPods dependencies in your project.
11. Updating Dependencies: If you need to update or add new dependencies to your project, follow these steps:
- a. Open the Terminal and navigate to your Unity project’s root directory.
- b. Run the following command to update your dependencies:
- sqlCopy code
- pod update
- c. CocoaPods will analyze your Podfile and update the specified dependencies to their latest versions.
- d. After updating, open the *.xcworkspace file in Xcode for games and rebuild your project.
12. Version Control and Podfile.lock: When using CocoaPods in your Unity project, including the Podfile is essential. Lock files in your version control system (such as Git)—the Podfile. Lock file ensures that everyone working on the project has the same version of dependencies installed. You are committing and sharing the Podfile.lock file helps maintain consistency and avoids potential compatibility issues.
13. Understanding Podfile Syntax: The Podfile uses Ruby-based syntax for specifying dependencies and their versions. It’s essential to familiarize yourself with the Podfile syntax, including specifying dependency versions, using different sources, and defining target-specific dependencies. The official CocoaPods documentation provides detailed information and examples on the Podfile syntax.
14. Managing Plugin Compatibility: When integrating CocoaPods in Unity, you may encounter compatibility issues between Unity plugins and the dependencies added via CocoaPods. Ensure that the plugins you use in Unity are compatible with the version of CocoaPods and the specific dependencies you’re adding. Check the plugin documentation or contact the plugin developer for guidance on compatibility and any necessary adjustments.
15. Troubleshooting CocoaPods Issues: While using CocoaPods, you may encounter issues related to dependency conflicts, installation errors, or build failures. In such cases, consulting the CocoaPods troubleshooting guides and community forums for assistance is crucial. The CocoaPods community is active and helpful, and you can often find solutions or workarounds for common issues.
16. Updating CocoaPods: CocoaPods is regularly updated with bug fixes, new features, and improvements. To ensure you’re using the latest version of CocoaPods, periodically update it by running the command sudo gem update cocoa pods in the Terminal. Staying up to date with the latest CocoaPods version can help you benefit from performance enhancements and bug fixes.
17. Consider Using Podfile Plugins: CocoaPods offers various plugins to further enhance your dependency management process. These plugins provide additional functionalities like caching, integration with alternative dependency managers, and more. Explore available plugins and consider incorporating them into your workflow to optimize your use of CocoaPods.
18. Documenting Dependencies and Installation Steps: Maintaining documentation on the dependencies added via CocoaPods and the steps required to integrate them into your Unity project is essential for future reference and collaboration. Documenting the specific versions of dependencies and any necessary configuration or setup can help streamline the onboarding process for new team members or future updates to your project.
Considering these additional points, you can maximize your efficiency and productivity when working with CocoaPods in Unity. With proper version control, troubleshooting techniques, and up-to-date with the latest tools and plugins, you can effectively manage iOS dependencies and create amazing experiences for your Unity games on iOS devices.
Conclusion:
Integrating Xcode for games in Unity gives developers powerful tools for creating and deploying games on iOS devices. By following the steps outlined in this guide, you can seamlessly export your Unity project to Xcode, customize the project settings, build, test, and submit your game to the App Store. With continuous iteration and updates, you can enhance your game and deliver engaging experiences to a wide audience of iOS users. So, harness the potential of Unity and Xcode for game integration and bring your game ideas to life on iOS platforms. Happy coding and game development! Integrating CocoaPods with Unity for iOS game development lets you easily manage and incorporate third-party libraries and frameworks into your projects.
By following the installation process, creating a Podfile, adding dependencies, and integrating CocoaPods with Unity, you can streamline managing iOS dependencies and take advantage of the rich library ecosystem. With CocoaPods, you can enhance your Unity games with additional functionalities and accelerate your iOS development workflow. Happy coding!